About Timesheets AI

What you'll learn
What is Timesheets AI?
Timeline Highlights
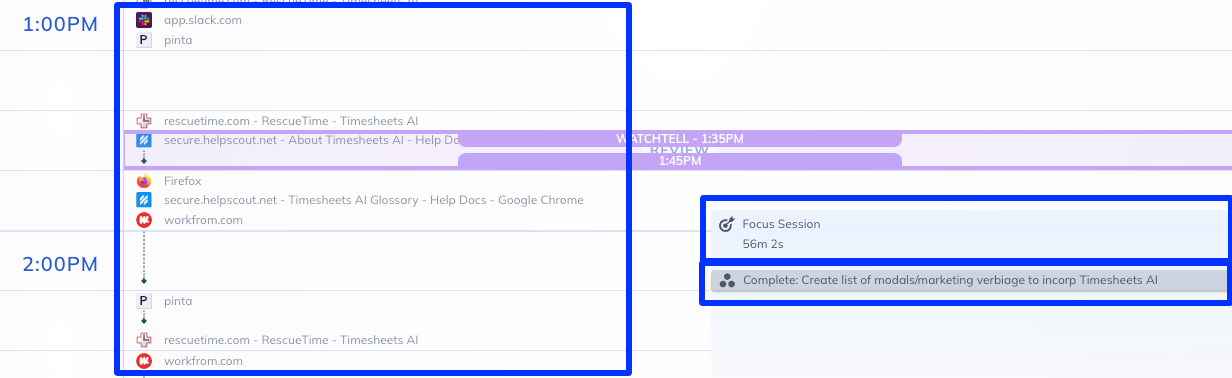
 The AI will offer suggestions for which projects it thinks you were working on at various points throughout the day. This allows you to easily review the suggestions and either accept them or make adjustments as necessary.
How Timesheets AI Works
Here we'll walk you through how to add projects and label your time to help you get your timesheets in order.
Adding Projects
When you first use Timesheets AI, you will need to enter the projects you wish to track. Click the New Project button and enter the below information.
You can Assign to Client or create a new client in this modal. You can assign Available Tasks or create a new task from the modal.
Enter AI Classification Hints that are unique to the project to help the AI assign your time, and choose a color to help you differentiate the projects. Hints should be short entries like file names, partial file names, or websites exclusive to a project.
Note—the AI will still work without hints. However, the more information you provide, the better the tool will be at categorizing your projects.

Labeling Time
There are several ways to assign time to your projects.
- If you have AI enabled, you can accept all the AI suggestions with one click at the top of the page.

- If you have AI enabled, you can accept, delete, or edit each AI suggestion. When you see Review in a time block, this is an AI Suggestion. Click on it to see your options.

- Check mark icon: Accept the AI suggestion
- Edit icon: Opens the project modal for you to edit the project
- Trash bin icon: Reject the AI suggestion
- Merge down: Sometimes you'll see this option when you have two blocks of the same project next to each other. This option will merge both blocks together.


 You can manually add project time to your timeline by dragging from the project names on the left side of the screen onto your timeline. Once placed on your timeline, you can drag the top and bottom edges of the project block to adjust its timeframe.
 You can manually add project time to your timeline by dragging from the project names on the left side of the screen onto your timeline. Once placed on your timeline, you can drag the top and bottom edges of the project block to adjust its timeframe.
- You can manually add project time to your timeline by clicking a section of the timeline and assigning it to your project. Click on a blank area with no project time and Select Project.
- Or click on a project block to assign each five-minute bucket to its corresponding project. Be sure to click Save when you're finished.


About the Timesheets Suggestions
You have the option to enable History, History & AI (powered by OpenAI), Or Off. This can be enabled from your Timesheets Settings page.
 Enabling History or History & AI will allow your activities to be assigned to projects automatically for your Review.

These time blocks are automatically generated by History, or History & AI for you to review and approve or reject.

Choosing Off will require you to assign all activities to projects manually. No automation will take place. Choosing this option will automatically switch the Timesheet Completion Schedule to Off.
You can control when you want your timesheet to be generated. Click on the edit icon to make your choice.

You can choose from the following options.

If you choose End of my work day or The next morning then you will see this alert on your Assistant that will provide a link to take you right to the timesheet. If you choose Off then you will not receive a timesheet alert.

By default, app-generated time blocks have a minimum span of 15 minutes. You can shorten these time blocks by clicking on the edit icon. Choose from 5 or 10-minute increments.

Archives
Once your project is completed, you can save your projects by clicking on the three-dot ellipsis next to the project and choosing Archive project.

You can find your Project archives under Projects > click on the Project Archive button. You can also create a New Project, edit and archive projects. 
Your completed projects will be kept safe here and there's even an option to restore them.

You can also create a New Client, edit, archive, or view a Client Archive. Just go to Timesheets > Clients

You can also create a New Task, edit, archive, or view a Task Archive. Just go to Timesheets > Tasks

You can delete a Project, Task, or Client at the archive level only if there is no time attached to them.
Other Settings
You can control these other settings from your Timesheets Settings page.
Link any or all of these integrations to RescueTime and they'll be a part of your timeline. You can read more about the integrations and how they work here.
 You can choose your default billing rate for all projects when they are flagged as billable. This can be overridden per-client, per-task, or ad hoc in reports.

You can choose your default view when you sign in. This view can land on Timesheets AI or the Overview page (or Dashboard). Choosing the option Both will display the Timesheets AI page when you sign in.

If you want to disable Timesheets AI and don't want to track projects, you can disable it from the Product Settings page. Under Enable Timesheets, switch the toggle to off. This will remove Timesheets AI from your navigation menu.

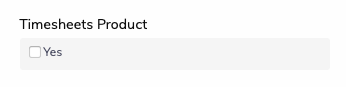
In RescueTime Classic, follow these steps to disable Timesheets AI: Account > uncheck Yes under Timesheets Product > click Save Changes